::: tip Prerequisites
To follow along with this tutorial, you will need to register with Speckle and install the required connectors 🔌. It takes less than 3 minutes!
For a comprehensive overview of these connectors, check our docs 📚!
:::
Getting Started
Before getting started, check that you have a supported version of Rhino (6 or 7) and Revit (2019-22) and the Speckle 2.0 connectors installed for both Grasshopper and Revit.
With the setup sorted, download the Revit and Grasshopper files for this tutorial here.
Sharing Project Data
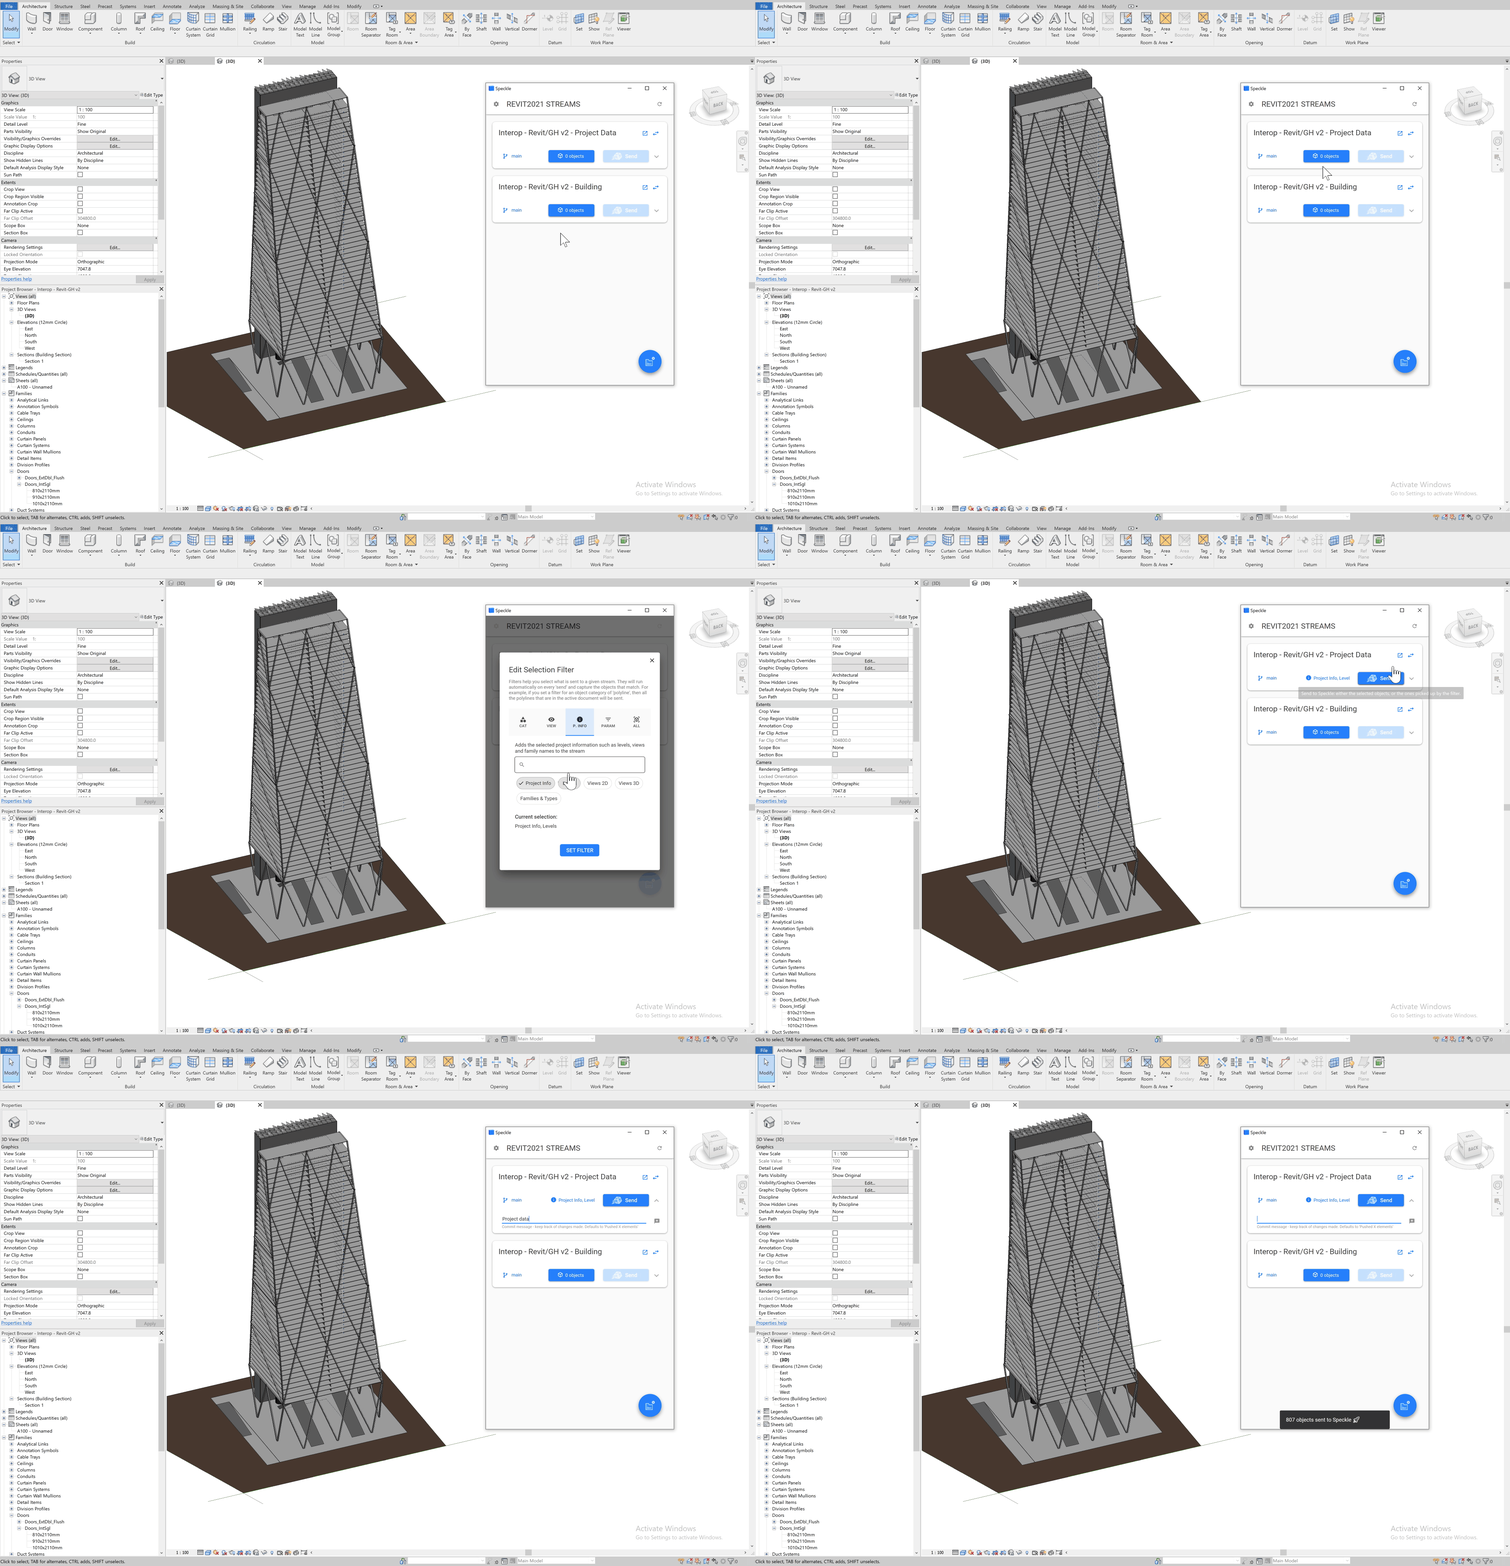
In many cases, we'll want to share some basic project data between software, such as our Revit model's views, existing levels or loaded families. These types of elements are not really selectable in Revit, but we can use one of Speckle's filters to get them across.
- Create a new stream called
Interop - Revit/GH v2 - Project Data. - Select the
Project Informationfilter - Choose the Project Info, Levels and Families & Types options and press
Set Filter.
You should see the filter selection appear in the Stream card. - Press
Send.
Sharing Revit Elements
Now that everyone can access the project data, let's create a new stream to send a few building elements over.
In this case, we'll be sending the Walls, Floors and Structural Framing, over to Grasshopper.
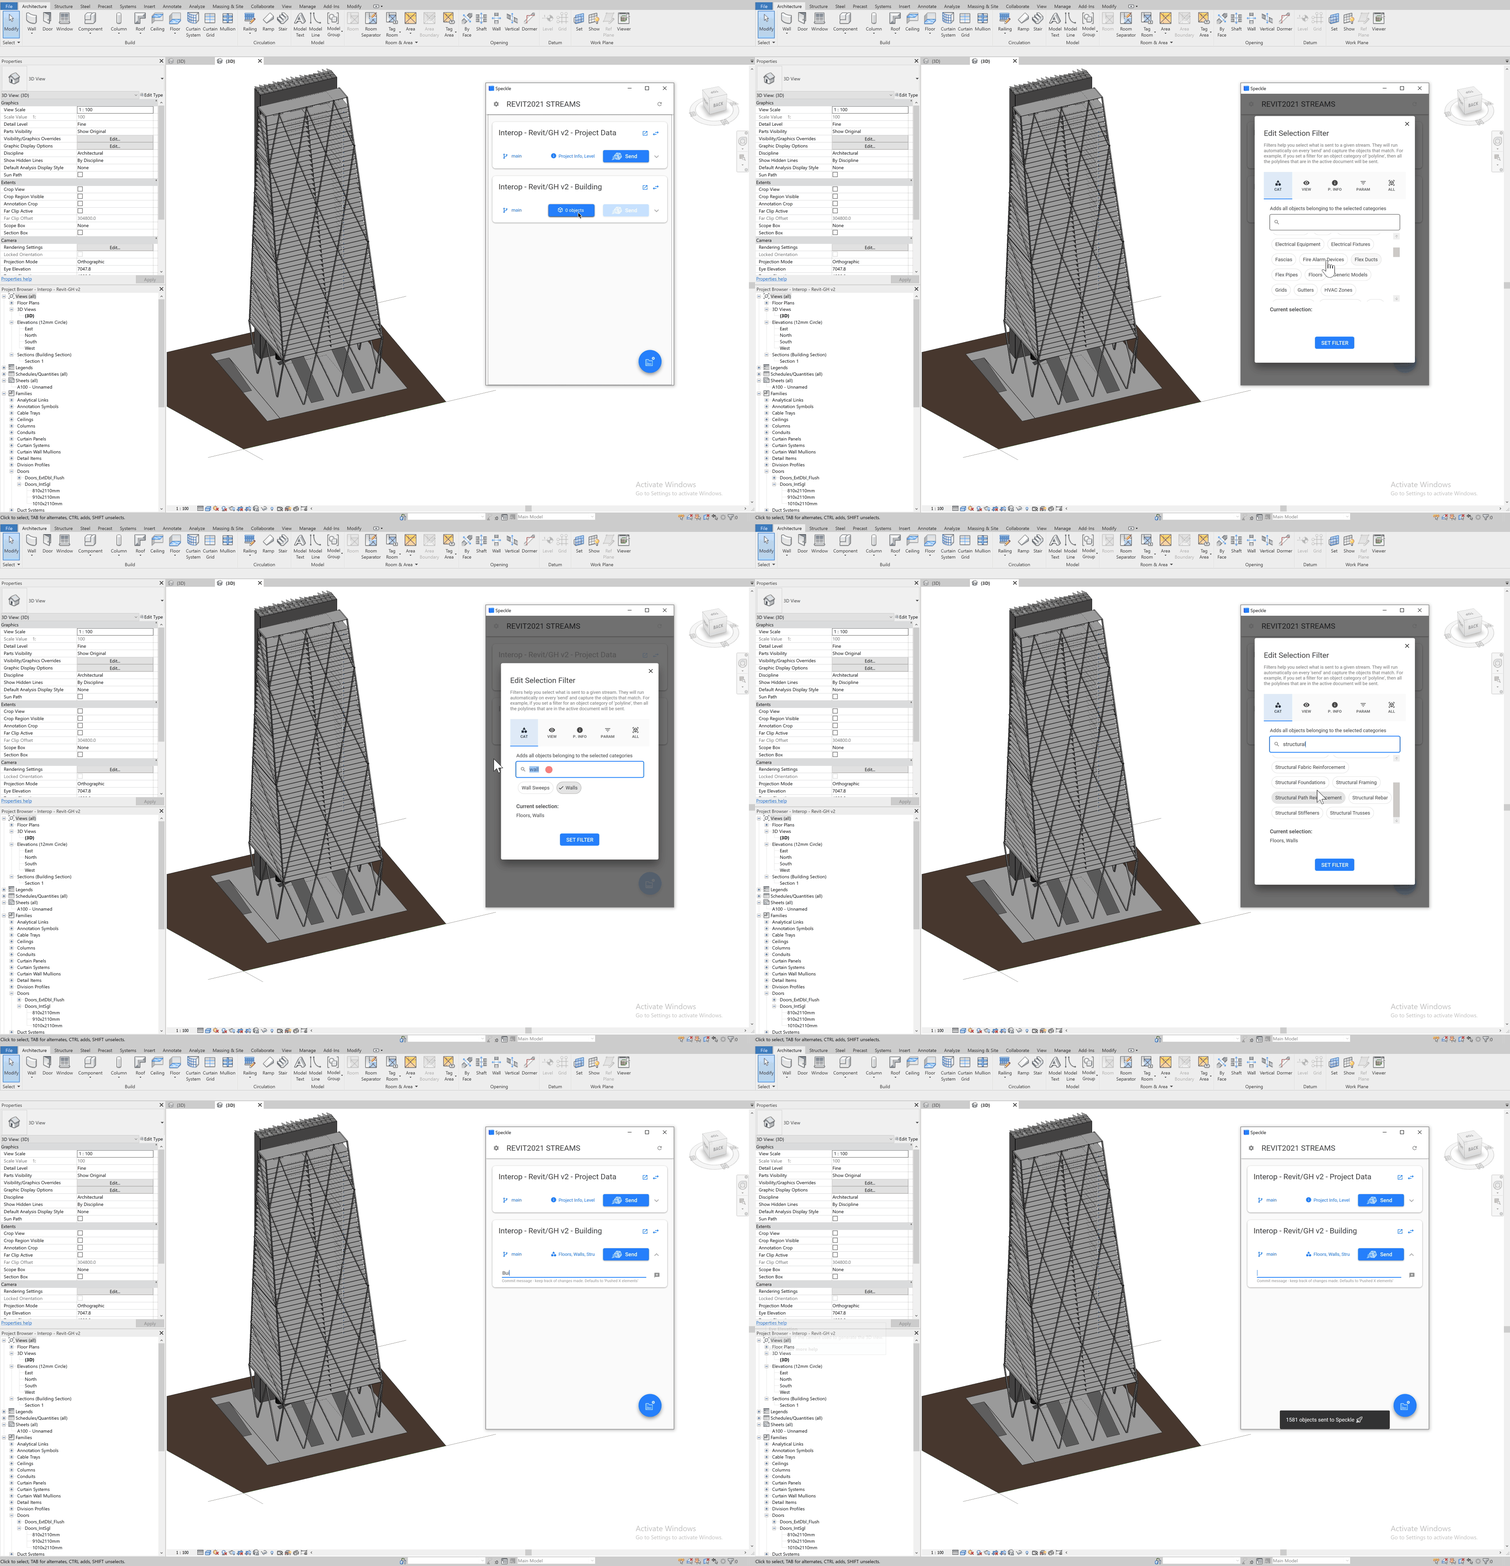
- Create a new stream called
Interop - Revit/GH v2 - Building. - Select the
Categoryfilter - Choose the Walls, Floors and Structural Framing categories and click on
Set Filter.
You should see the filter selection appear in the Stream card. - Press
Send.
Receiving Revit Elements in Grasshopper
Now we have both our Project Data and some Building Elements saved as streams in the Speckle server. Let's switch to Grasshopper and use those elements to do some simple Grasshopper tasks.
Displaying Existing Levels
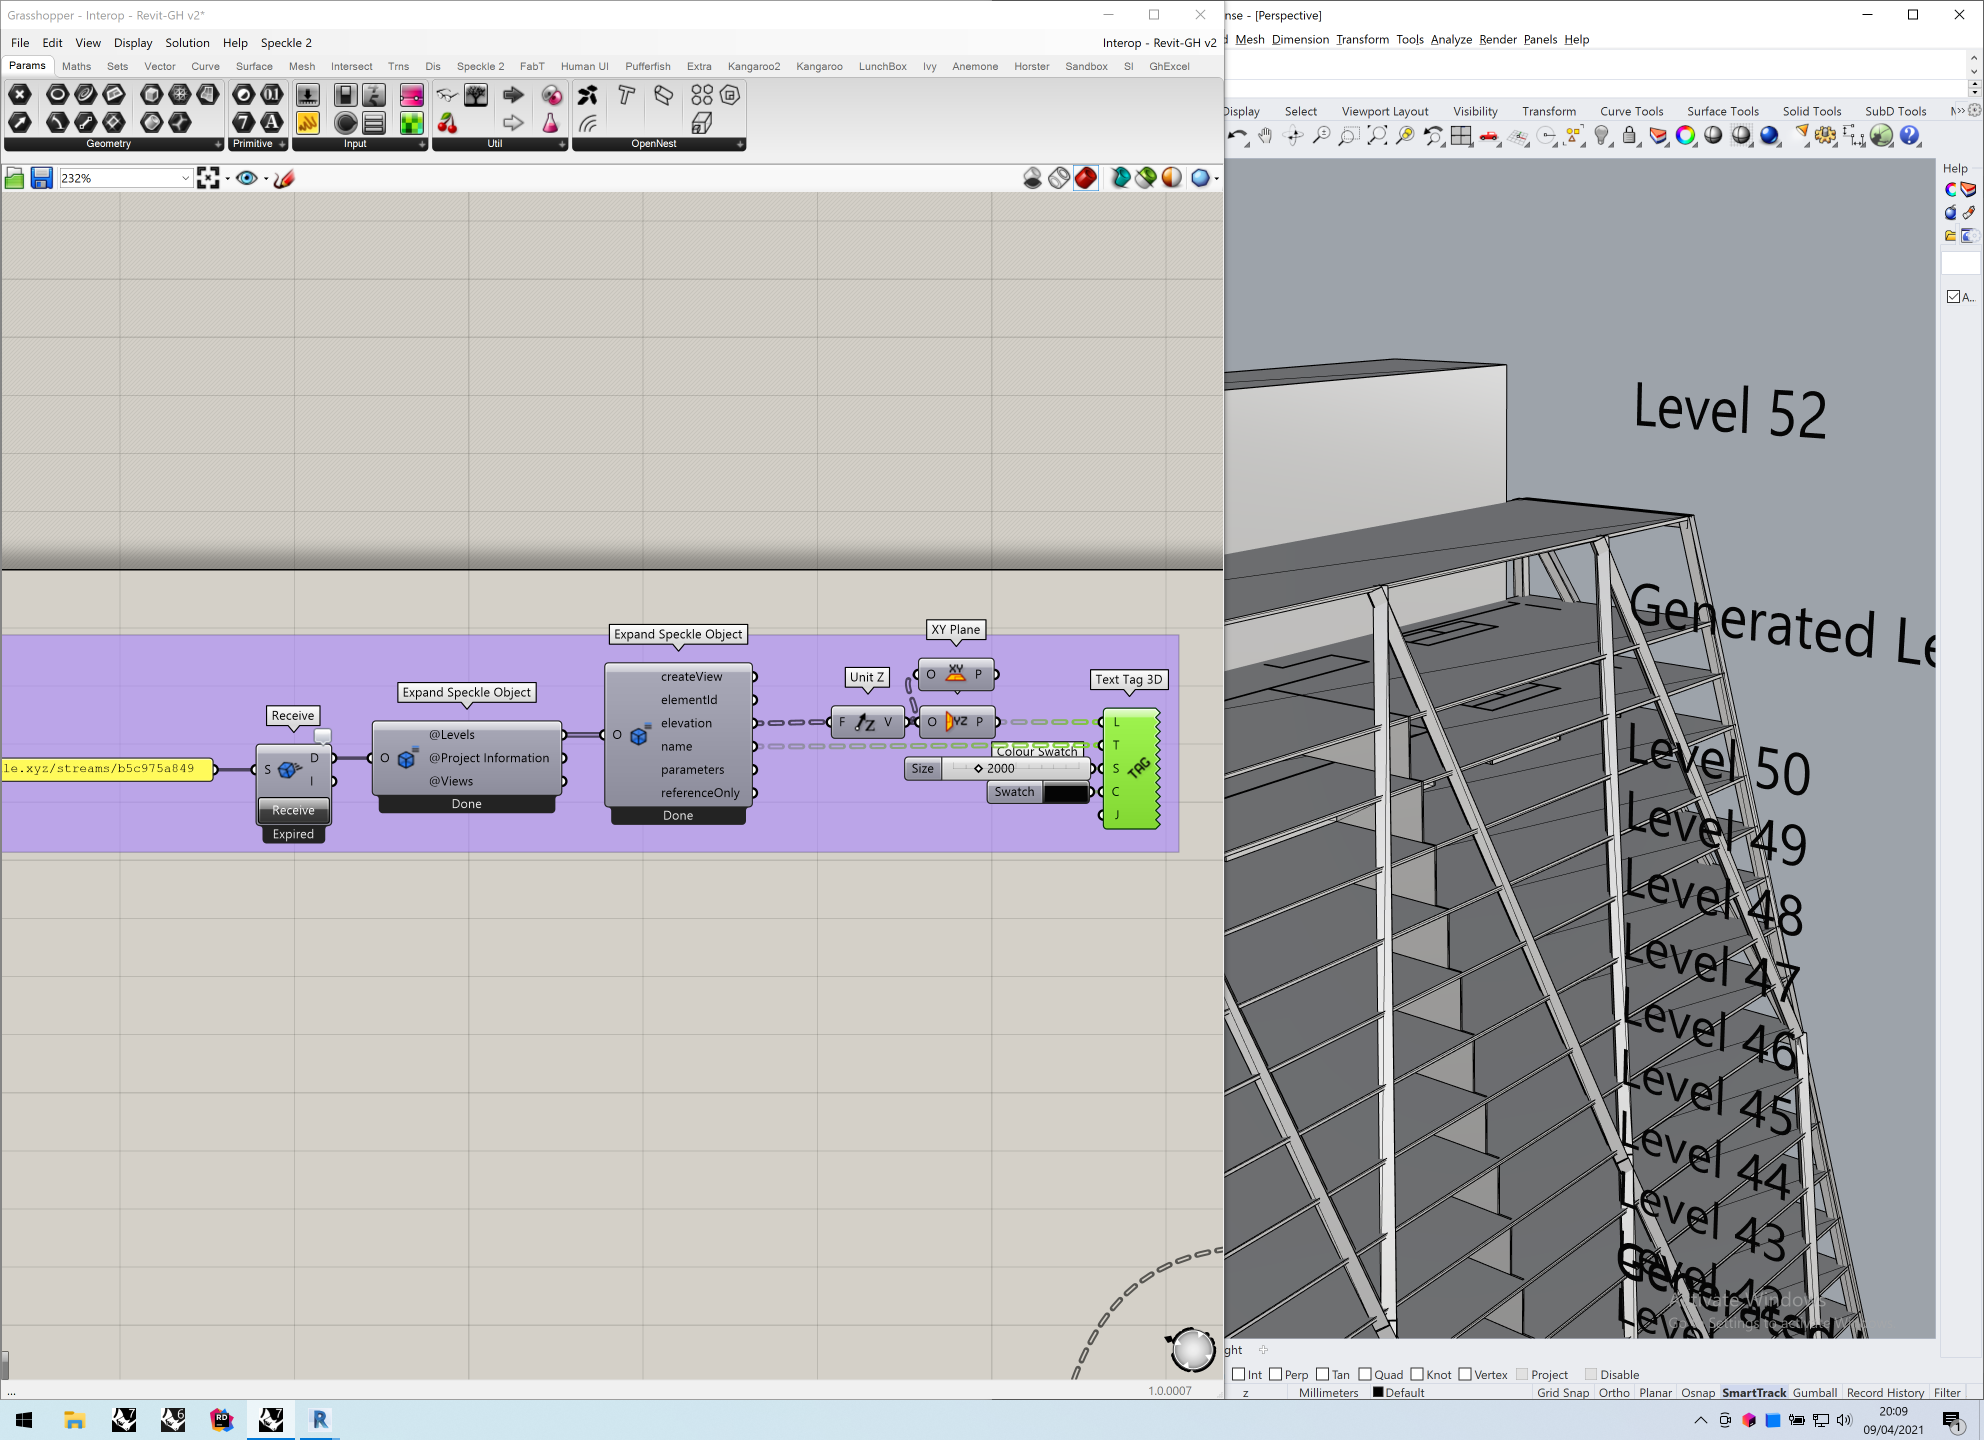
Included in the Project Data we sent over we have the levels from Revit.Let's create some planes at each elevation, and use those to display the name of each floor.

Create a Receive node and a panel with the Interop - Revit/GH v2 - Project Data stream url.
Connect the panel to the only input in the Receive node.
Press the Receive button inside the node and wait for the process to finish.
::: tip Base objects
You'll notice that the data you received is a Base object. In order to see what's inside that Speckle object, we need to expand it.
We'll use the 'Expand Speckle Object` node extensively in this guide.
:::
Create an ExpandSpeckleObject component and plug the Base object into it's input.
The node outputs will display the different properties available on that object. There will be a @levels output.
Create another ExpandSpeckleObject to the @levels output.
The node will display the properties available for each level in the building, including its name and elevation.
Create a vector using the elevation value, and plug that into an XY Plane node.
Create a Text Tag and plug our newly created planes and our level names.
If everything went well, you should see on your screen the generated planes and text tags with the level names on each position.
Displaying Revit Elements in Grasshopper
Let's also receive the Revit elements we sent to the Interop - Revit/GH - Building stream.
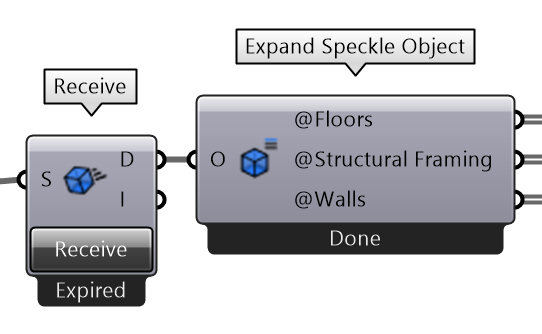
Create a Receive node and a panel with the Interop - Revit/GH v2 - Building stream url.
Connect the panel to the only input in the Receive node.
Press the Receive button inside the node and wait for the process to finish.
Create an ExpandSpeckleObject component and plug the Base object into its input.
::: tip
You'll see that every category we selected on the Revit filter is organized in different outputs: Floors - Structural Framing - Walls
:::
Visualizing Revit Elements
Every Revit element will always have a displayMesh property containing the geometric representation of that object.
In order to access it, we can use the Speckle Object Value by Key node to just fetch the mesh from the elements we received. The ouptut can then be previewed in the Rhino window.

We can now proceed to extract some parameters from each object and use them to color our elements accordingly.
Color by Category
Coloring by category is the most straightforward. Using the data tree we generated with our elements:
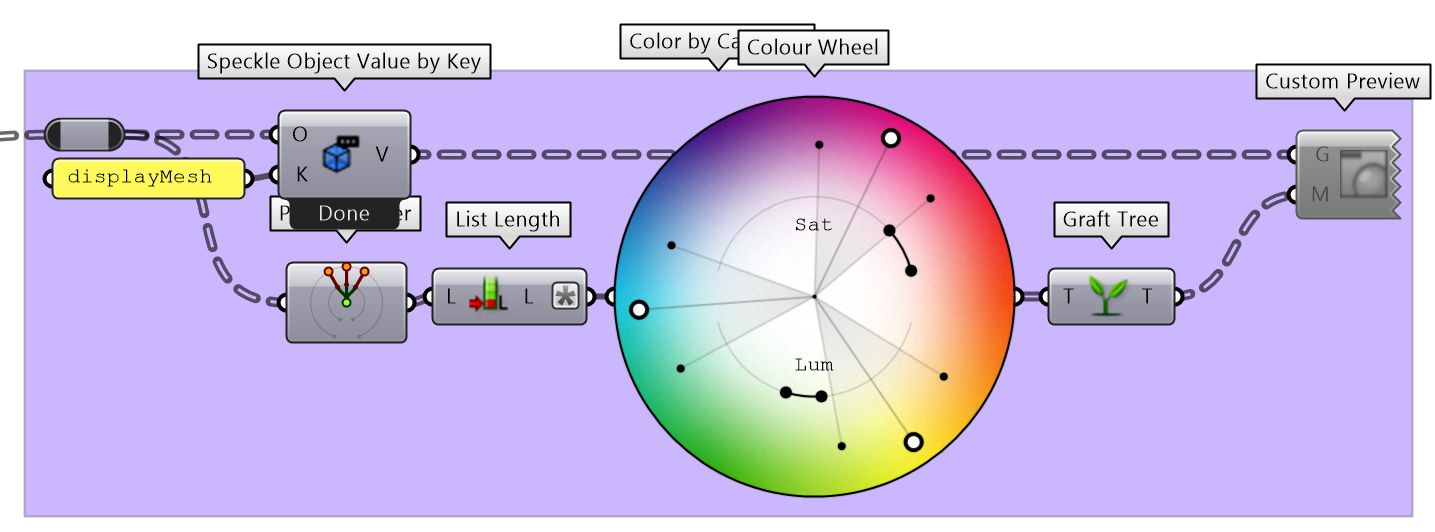
- Extract the
displayMeshvalue from each element - Generate one color for each of the branches in our
data tree - Connect the meshes and colors into a
Custom Previewnode.
Color by Level
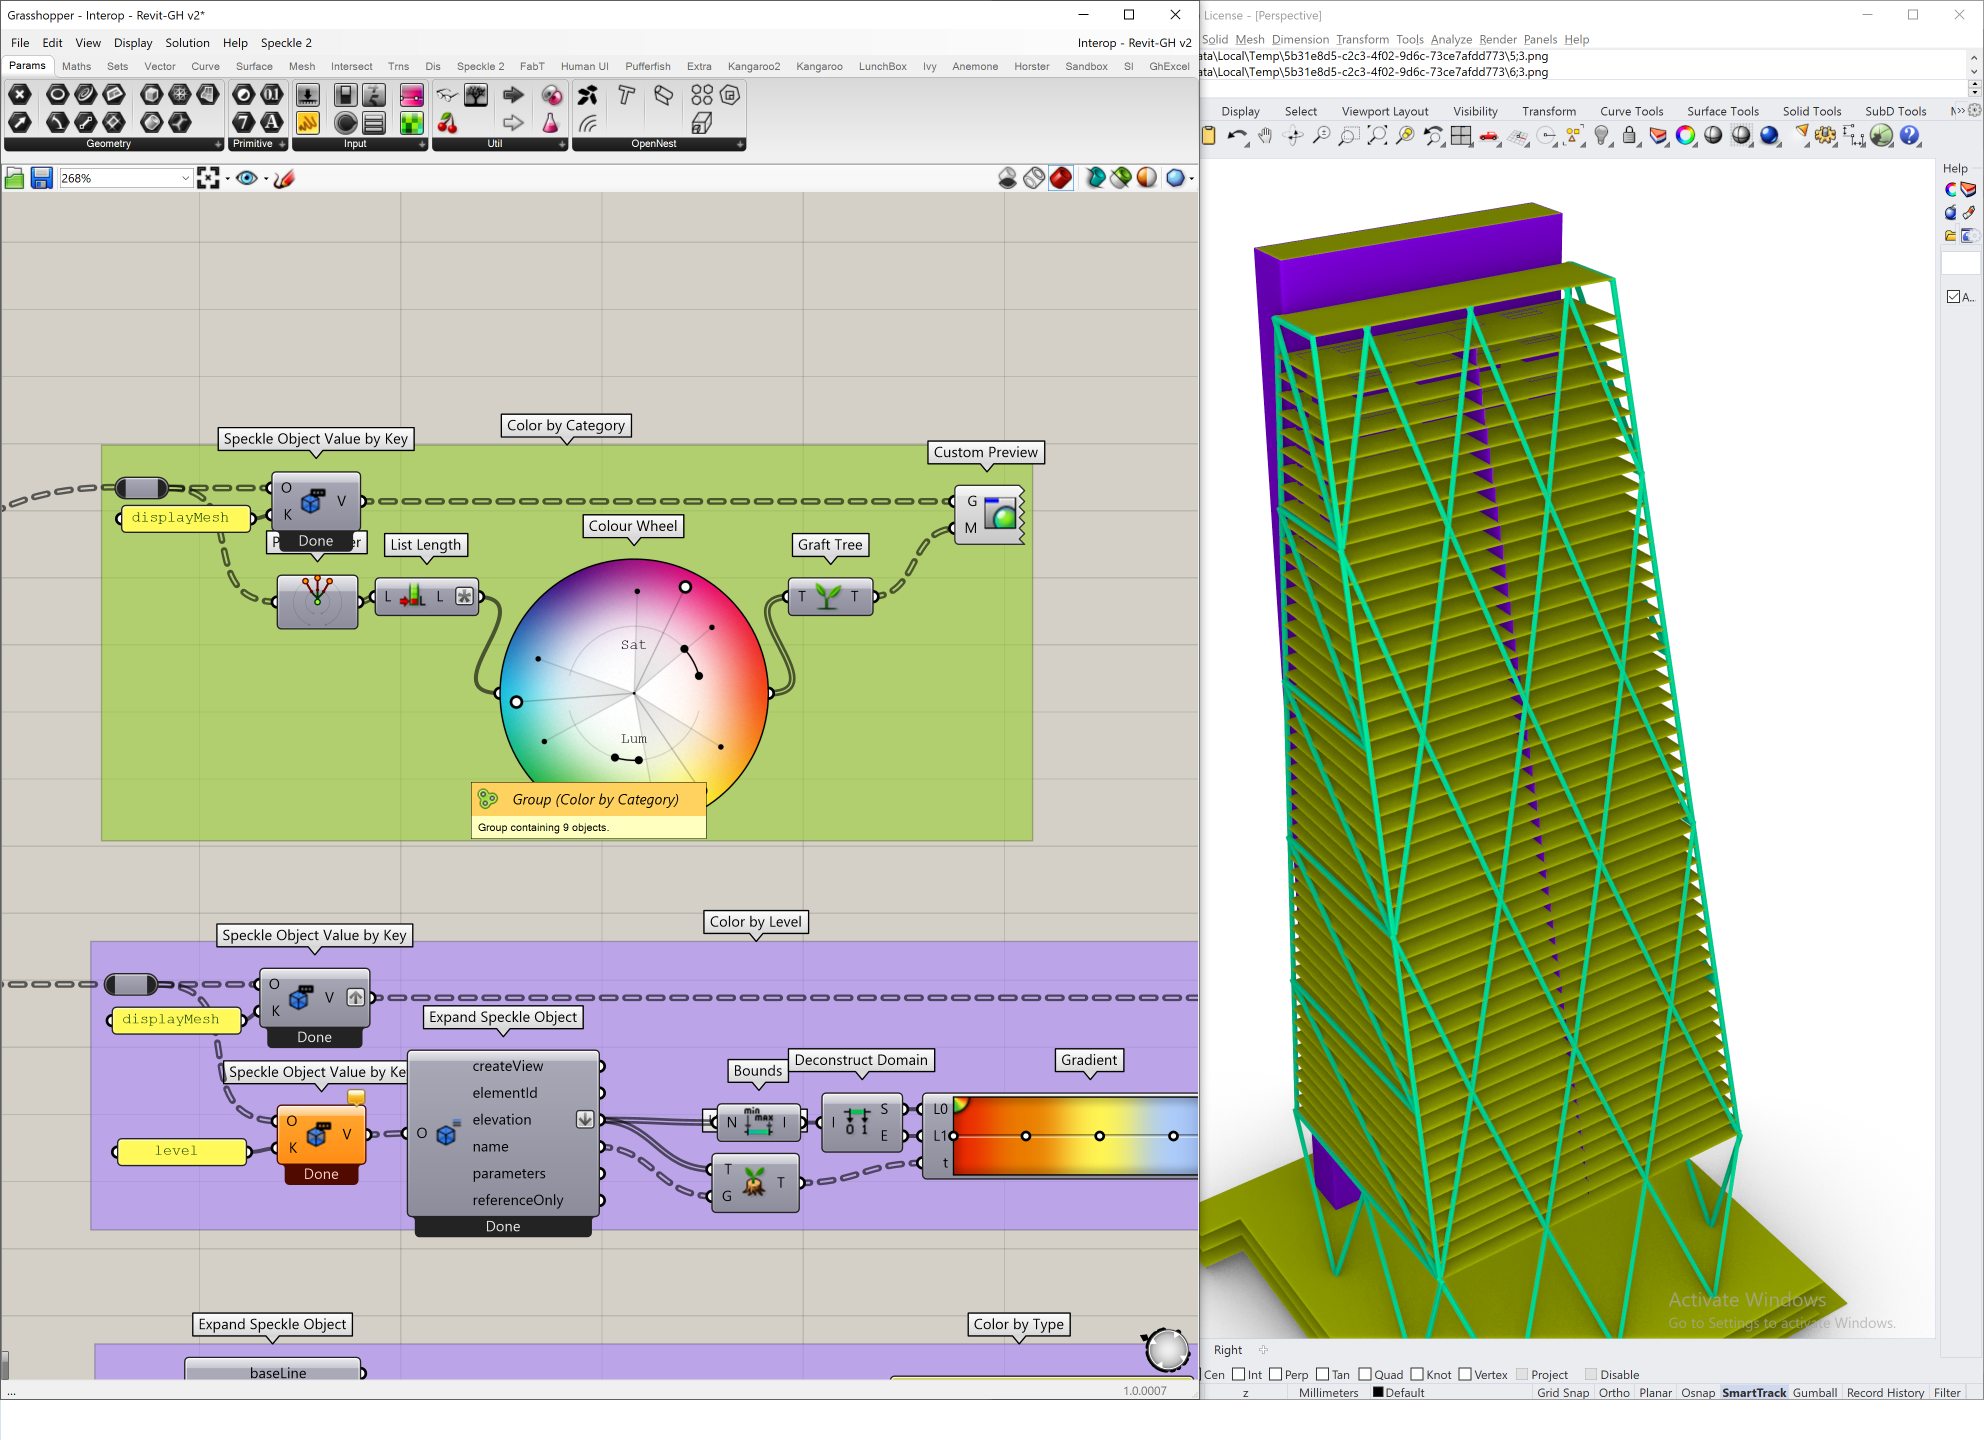
Coloring by level requires also extracting the assigned level for each element. We can do it just like we did for the displayMesh

- Use a
Speckle Object Value by Keyto get thedisplayMeshandlevelof each object. - Use an
ExpandSpeckleObjectnode to obtain thenameandelevationof the floor assigned to each element. - Using some grasshopper magic, create one color per elevation value (we are using a gradient for this).
- Connect the meshes and colors into a
Custom Previewnode.
Color by Parameter Value
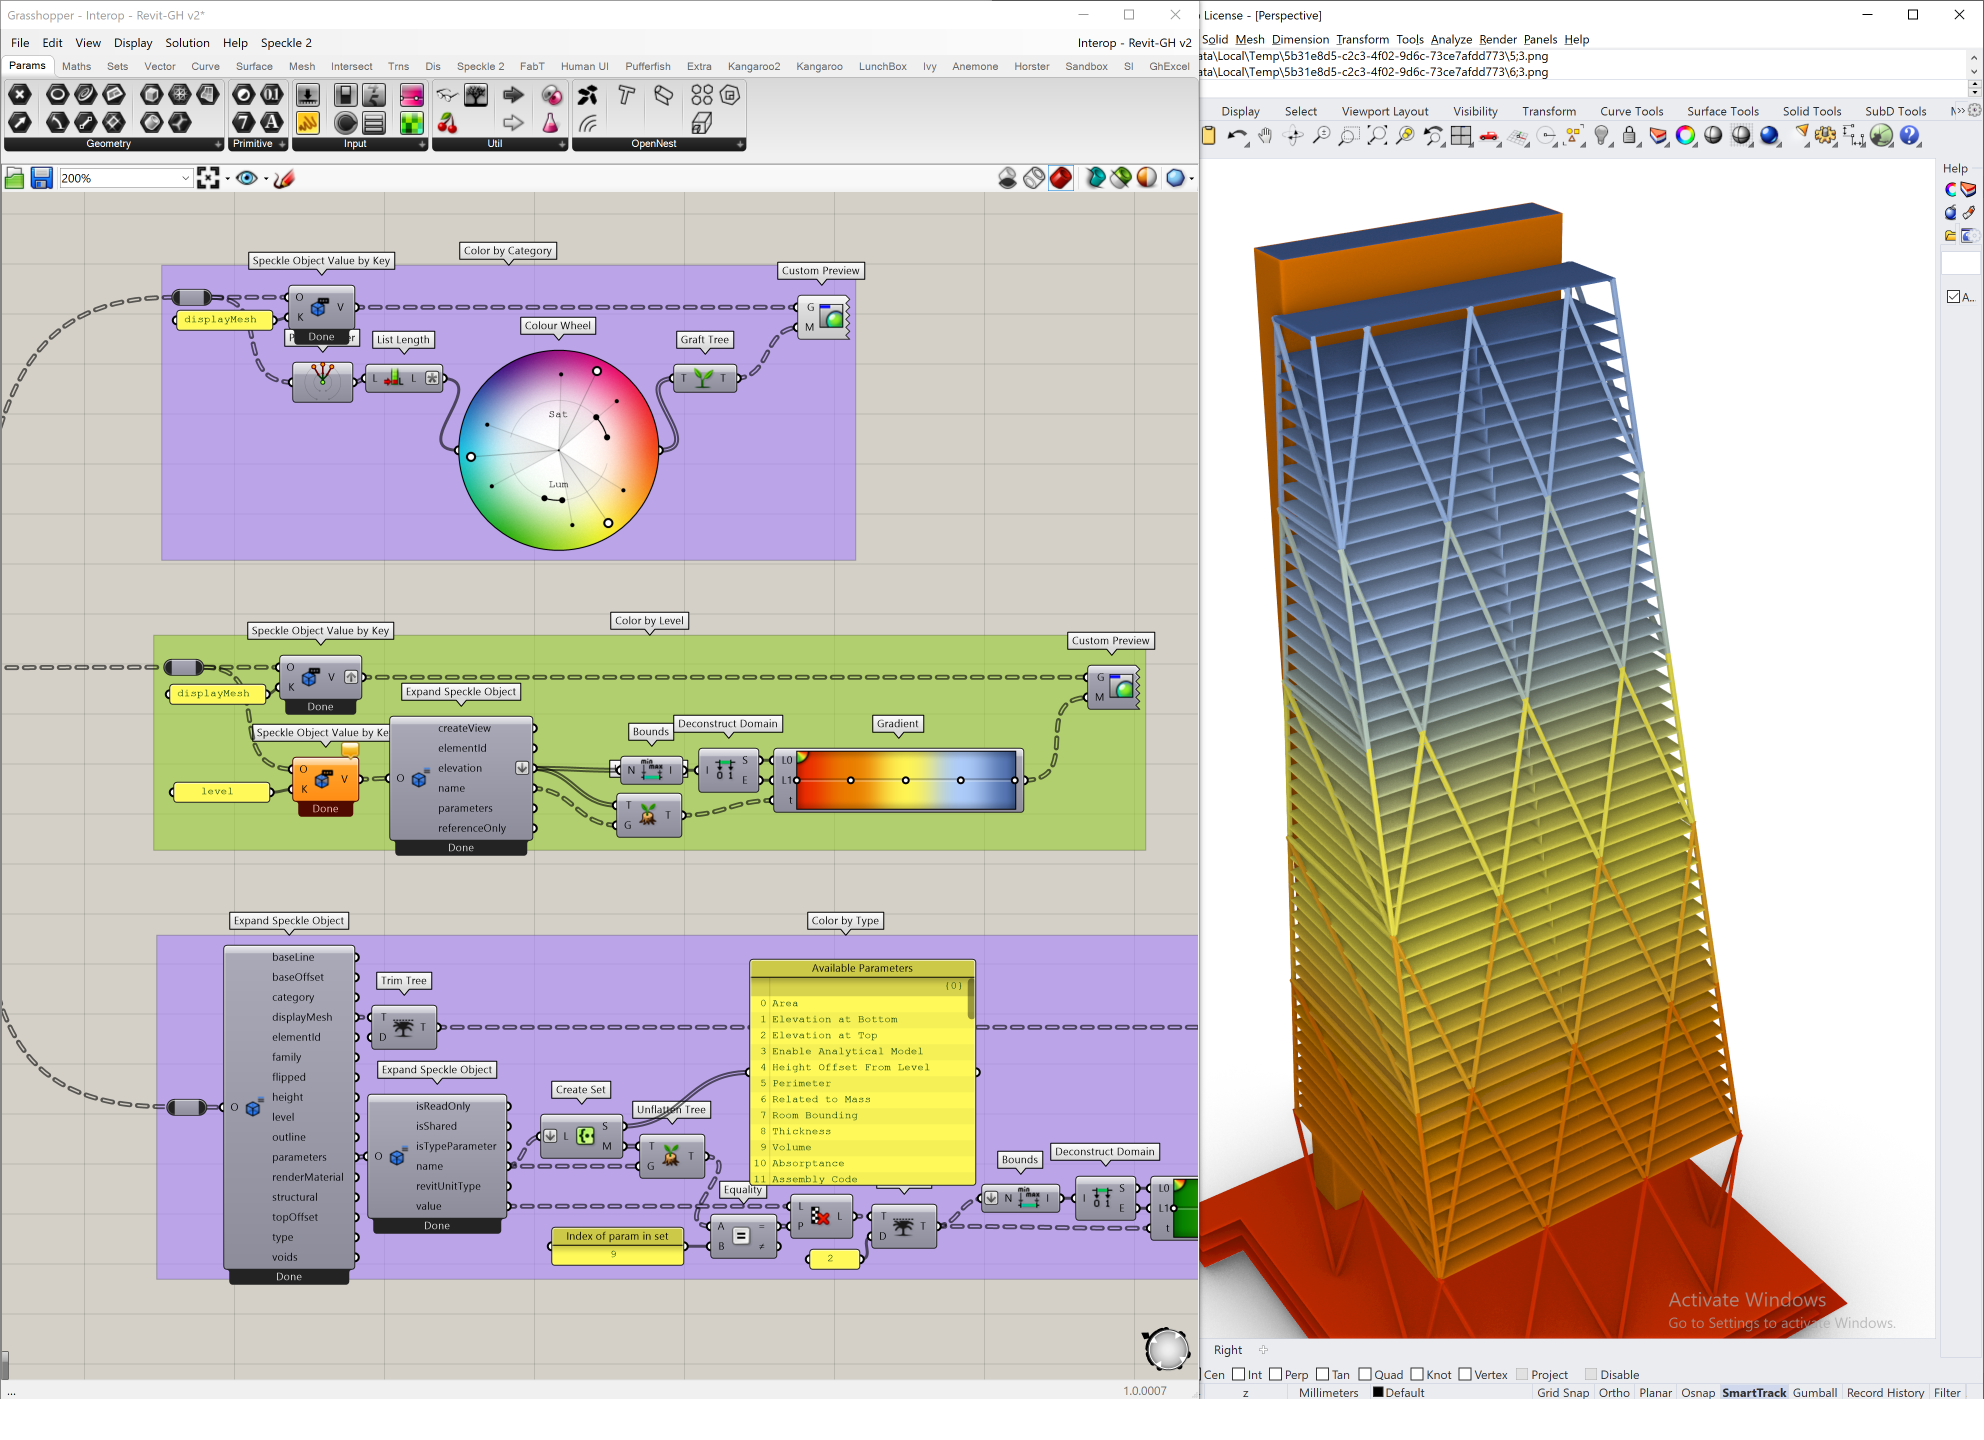
Coloring by parameter requires a little bit more Grasshopper knowledge. As you'd have to handle the parameter list on your own.

- Use an
Expand Speckle Objectcomponent to retrieve all the properties from the elements. We're interested in thedisplayMeshand theparameterslist. - Use another
Expand Speckle Objectcomponent to retrieve the properties of each parameter. - To simplify our work, create a set out of all the parameter names.
- Now you can use that set to select a specific parameter value (in our case the volume, index 9) and use those values to drive our gradient.
You should see the colored elements in the Rhino viewport (in the screenshot, green is smaller and red is bigger).

Updating Revit Parameter Values from Grasshopper
So far, we're received Revit elements and played around with their values in Grasshopper. Next, let's send some extra information back to the original Revit model (labelling elements, modifying family types or any other parameter change).
::: tip
You can send parameter updates to Revit using the ParameterUpdater schema. For that, you'll need to:
- Create a new
Create Schema Objectnode, and select from the pop-up theParameterUpdateroption. - Repeat the same step, but select the
Paramteroption from the pop-up.
The process is quite simple, you first need to create a parameter with a name and a value. Then, in the ParameterUpdater you specify the elementId of the element you want to modify, and the parameter object we just created.
In order to be able to update a parameter value, the parameter must exist in the element.
:::
Sending Updates from Grasshopper to Revit
Let's use this to update the Mark parameter (which exists in all Revit elements) of all walls in our model.
We're just going to name each wall sequentially with the pattern WALL1, WALL2...WALLXX, so each wall will have a unique Mark value.

- Connect the walls to an
Expand Speckle Objectnode. - Using the
elementIdcreate a list of numbers of the same length and concatenate it with the textWALL. - Connect the list to the
Parameternode, and connect a panel with the text Mark to thename - Connect the
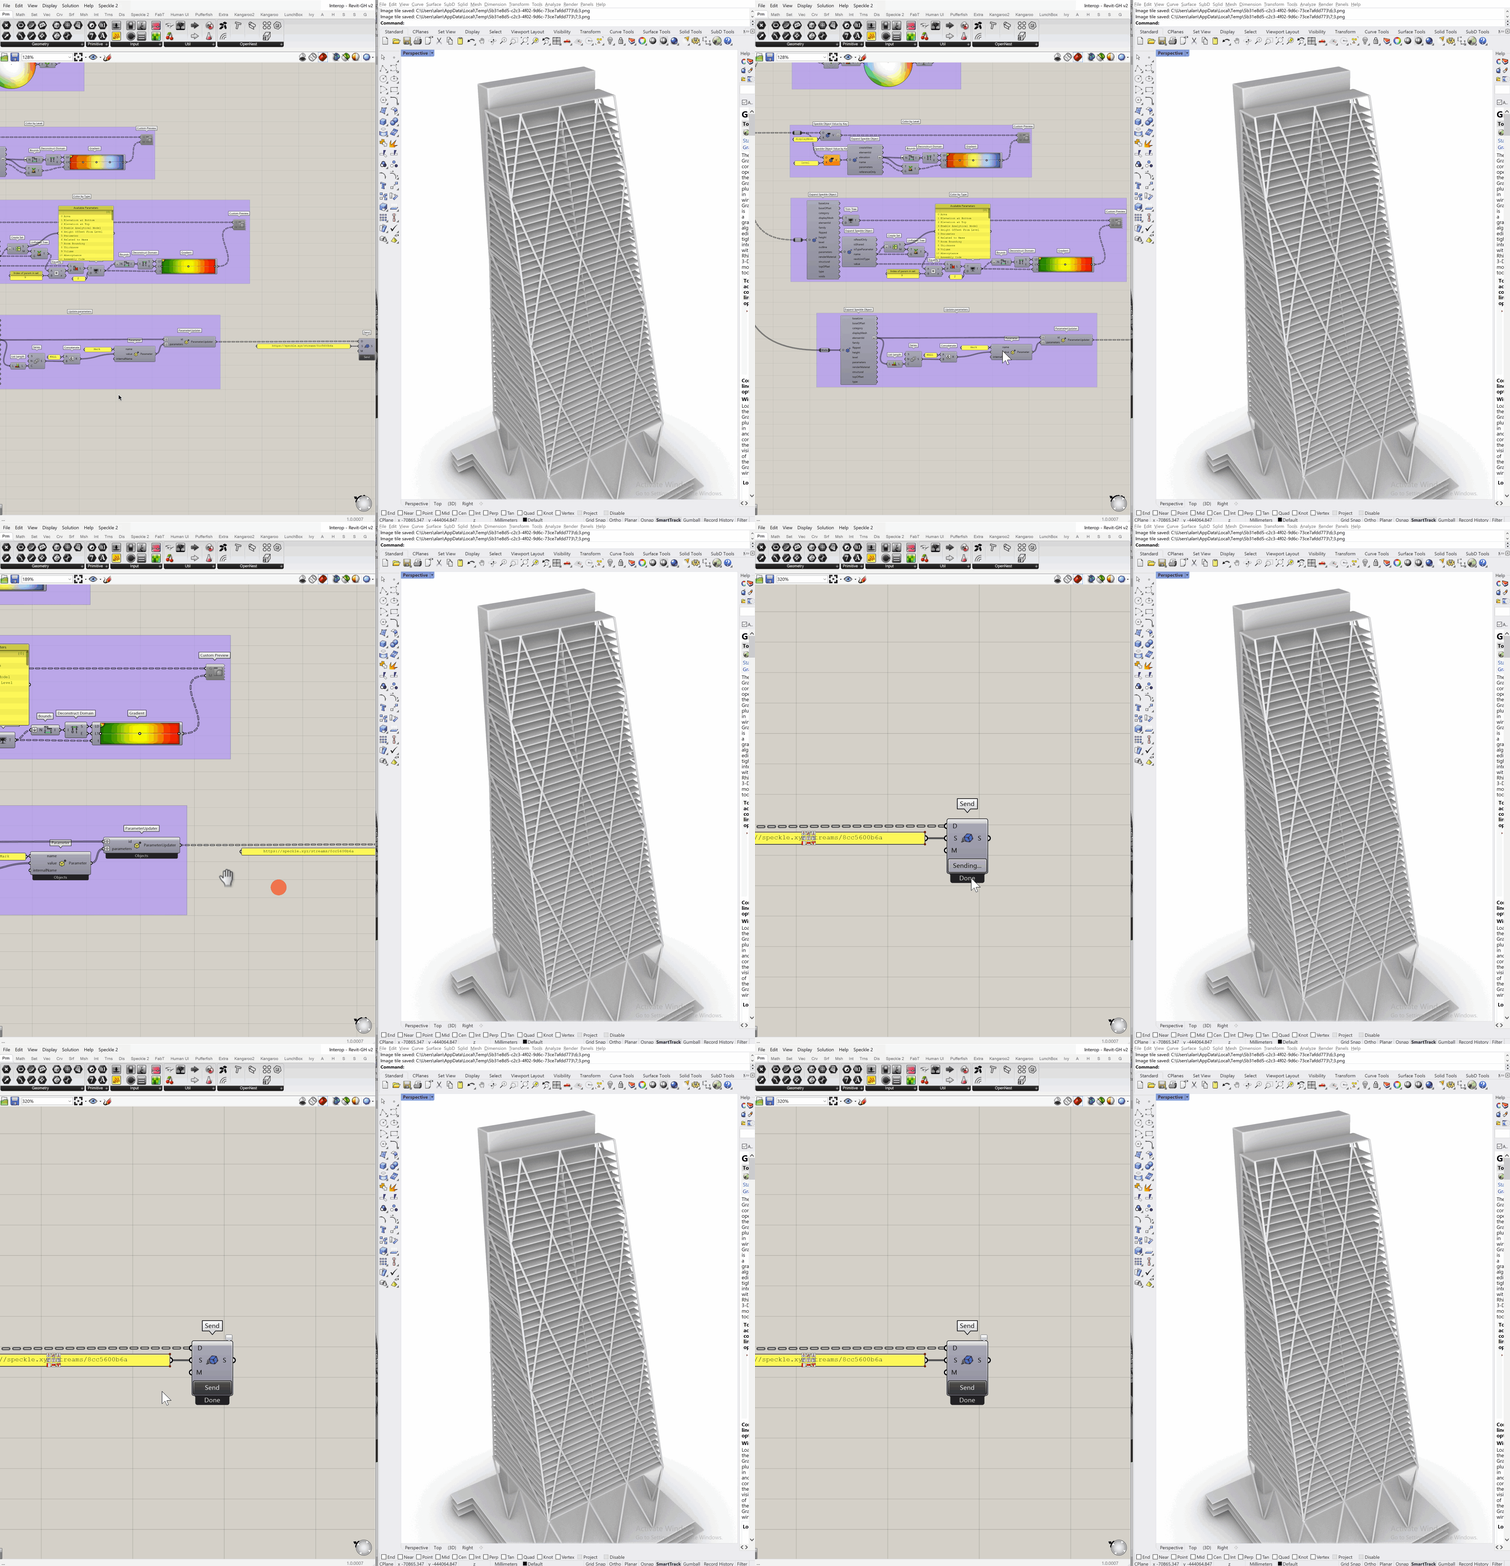
elementIdand theparameterlist appropriately in theParameterUpdaternode.
We will also need a new stream and Send Data node to send this data to Revit. Create a new stream called Interop - Revit/GH v2 - ParamUpdate and send the ParameterUpdater elements.
Receiving the Updates in Revit
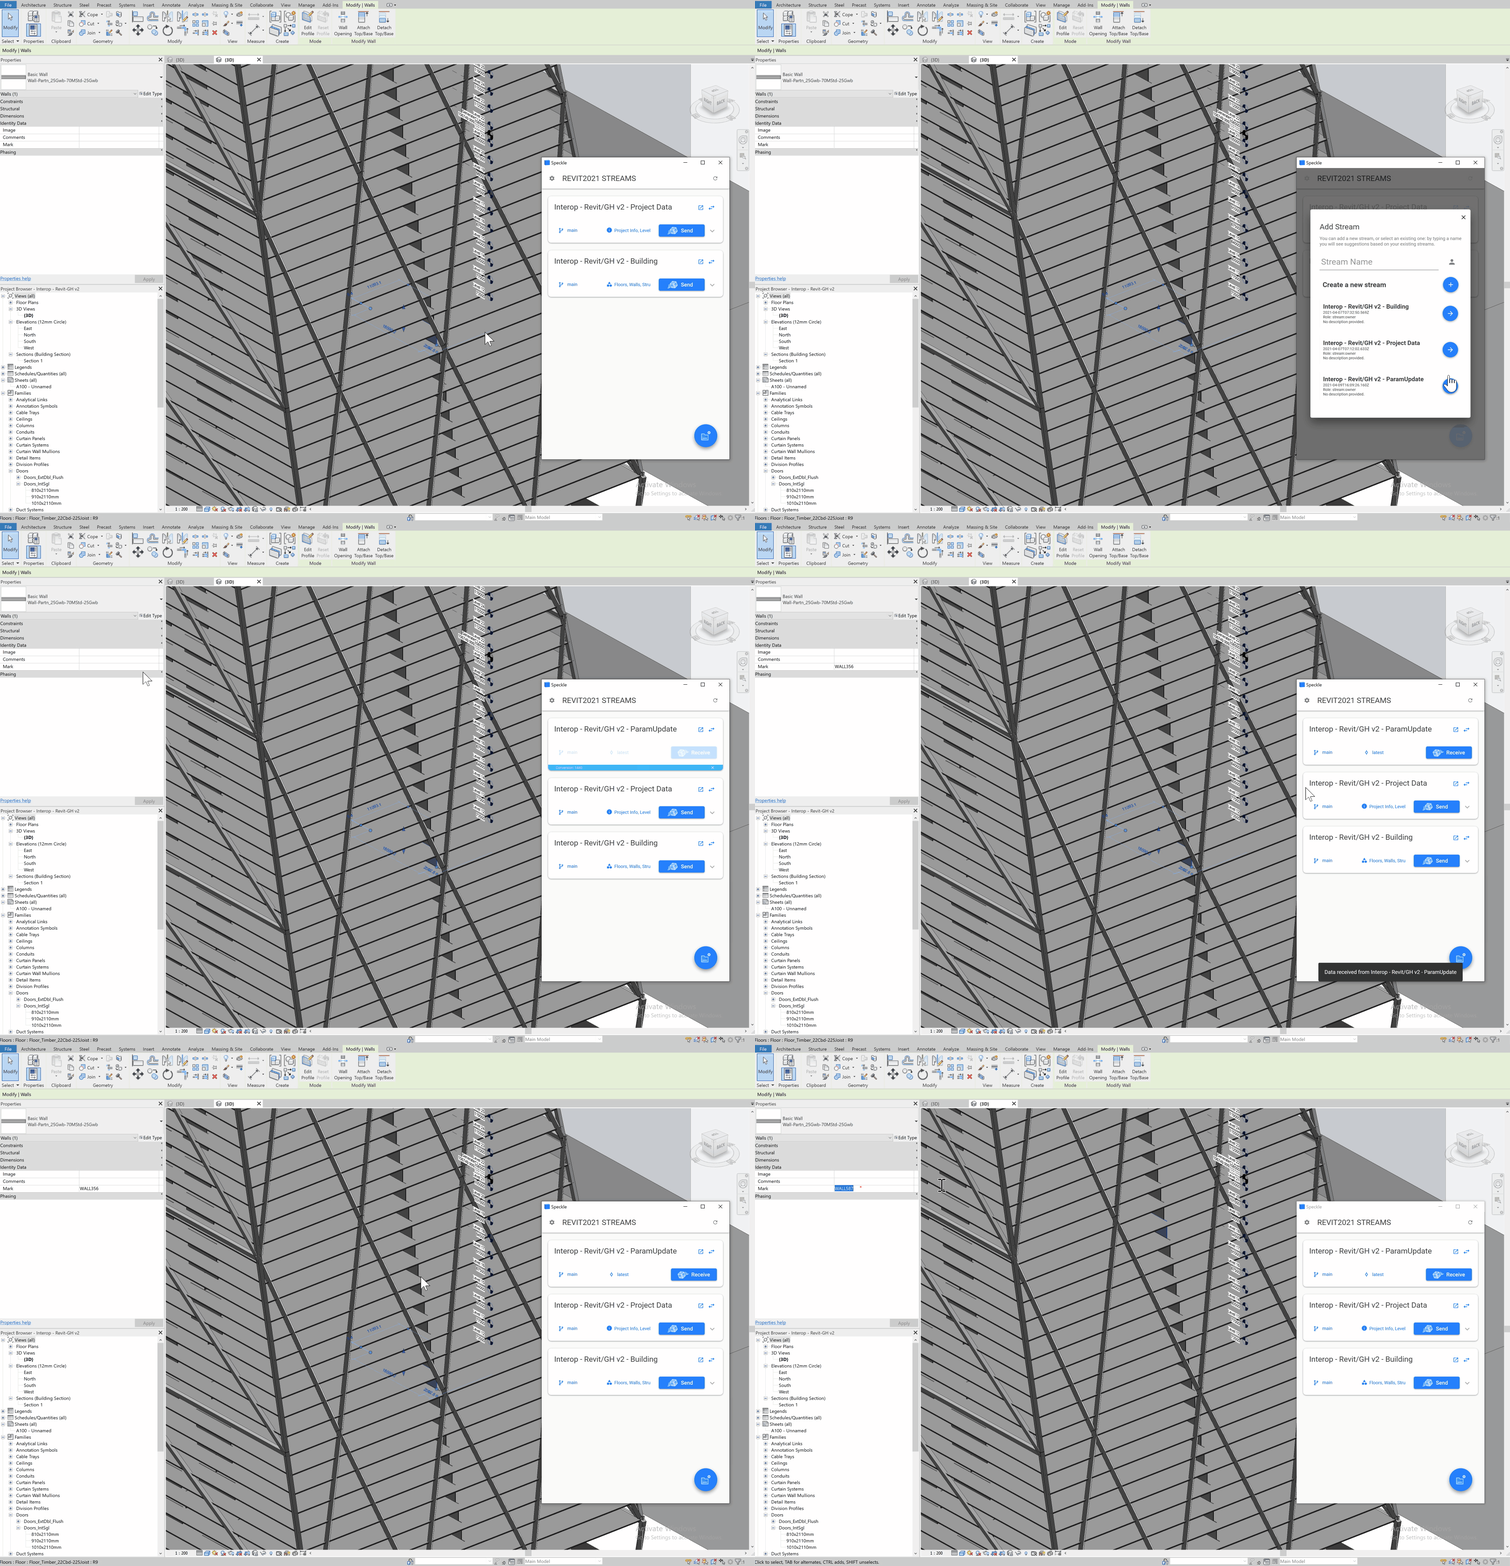
In Revit, add the stream we just created to your project and press Receive. Once the process has completed, you should see the Mark property has been filled with unique values for each wall. You can repeat this process as many times as is necessary.
Known Issues
Under the beta release, there is limited support for Solid elements to be sent from Revit to Speckle. Any solid that is not supported will be converted to a Mesh instead.
Speckle 2.0 is currently under beta. You can find any known issues on our GitHub Repo Issues page.
Conclusion
We hope you enjoyed this tutorial and found it useful!
Speckle is an Open Source project and we really ❤️ feedback, so if you have any questions, comments, critiques, or praises please let us know on our community forum.

